

How to Rebuild Worn Bores: Automated Welding Guide
- slinger6
- Aug 2
- 12 min read

Updated: Aug 4
Scrapping an expensive heavy equipment component just because a pivot point is worn isn't just a waste of money; it's an avoidable failure in shop efficiency. You've likely dealt with the frustration of manual welding where inconsistent beads and excessive heat lead to hours of unnecessary grinding and rework. This manual approach creates a bottleneck that keeps your machines in the shop while your overhead continues to climb and your project deadlines loom.
Modern automated bore welding systems have changed this dynamic by removing the human error and physical strain associated with out-of-position welding. This guide explains the professional process for restoring worn pin holes and pivot points to OEM specifications using reliable, automated technology. You'll learn how a methodical three-stage restoration process combines precision welding with line boring to deliver faster turnaround times and a perfect fit for every pin. We'll show you how to reduce labor costs and get your equipment back into the field with mechanical integrity you can trust.
Table of Contents
Why Heavy Equipment Bores Fail and the Case for Automation
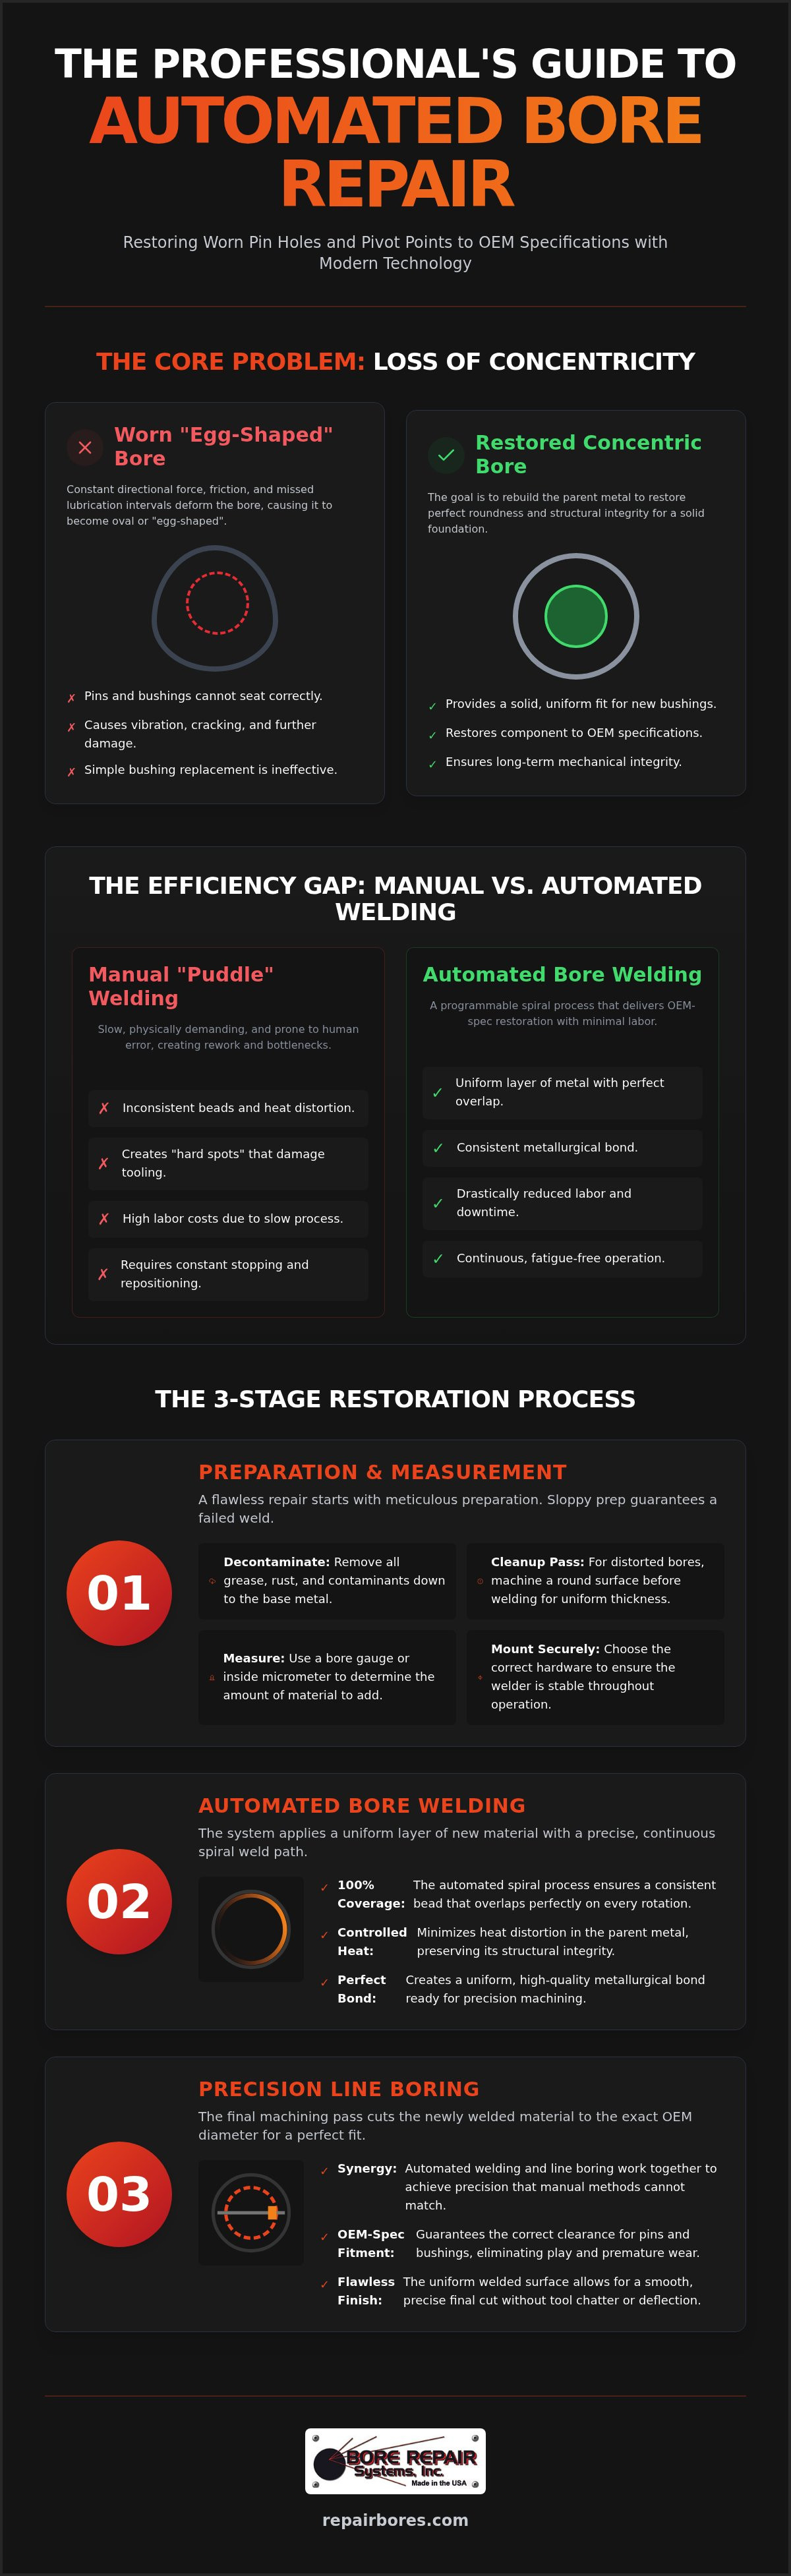
Heavy equipment relies on precision pivot points to transfer massive forces during operation. When these points fail, we identify the issue as a worn bore. This is more than just a simple increase in diameter; it is a fundamental loss of concentricity. A worn bore means the hole is no longer perfectly round, which prevents pins and bushings from seating correctly. This degradation usually stems from three primary factors: constant friction, a lack of consistent lubrication, and extreme structural loading. When a technician misses a grease interval, metal-on-metal contact quickly eats away at the surface. Over time, the pounding from digging or lifting deforms the metal, causing the pin to "walk" inside the hole and accelerate the destruction of surrounding seals.
Trying to fix these issues with manual welding is often a losing game. Manual "puddle" welding is slow, physically demanding, and prone to human error. It frequently results in uneven deposits and "hard spots" within the metal. These hard spots are a nightmare for the machinist later, as they can break expensive cutting bits or cause the boring bar to deflect during the final pass. Automated bore welding systems solve this by providing a consistent metallurgical bond across the entire inner surface. By controlling the heat and the deposition rate, these systems ensure the new material is uniform and ready for precision machining.
The Problem with Egg-Shaped Holes
Directional force is the main culprit behind oval wear patterns. In an excavator bucket or a loader arm, the load usually travels in one specific direction. This creates "egg-shaped" holes that simple bushing replacements cannot fix. If you press a round bushing into an oval hole, it will only have partial contact with the parent metal. This lack of support causes the bushing to vibrate, crack, or spin, leading to even more severe damage to the housing. Rebuilding the parent metal with a bore welder is the only way to restore the structural integrity of the component and provide a solid foundation for the new bushing.
Automated vs. Manual: The Efficiency Gap
The difference in shop time between manual and automated methods is staggering. Manual welding requires a technician to stop, chip slag, and reposition constantly. In contrast, an automated welding process runs continuously without fatigue. Automated bore welding is a programmable spiral process that ensures 100% coverage by laying down a consistent bead that overlaps perfectly on every rotation. This precision is one of the primary automated bore welding benefits that allows shops to move from a "best effort" repair to an OEM-spec restoration. By integrating automated bore welding systems into your maintenance workflow, you eliminate the guesswork and drastically reduce the labor hours required for every pin hole you rebuild.
Step 1: Preparing and Measuring Worn Bores for Repair
Success in bore repair starts long before you strike an arc. If your preparation is sloppy, your weld will be too. The first task is to strip the bore down to its base metal. You must remove every trace of grease, rust, and old bushing remnants. A wire wheel or a specialized grinding tool is usually necessary to clear out the carbon buildup and oxidized layers. If you leave contaminants behind, they'll gas out during the weld process, creating porosity that weakens the entire repair.
Once the surface is clean, evaluate the shape of the hole. If the bore is severely distorted or "egg-shaped," you shouldn't jump straight into welding. Instead, perform an initial cleanup pass with a line boring machine. This removes the high spots and creates a perfectly round, concentric surface. While it might seem like extra work, this step ensures that your automated bore welding systems apply a uniform layer of material. Without a round starting point, your weld thickness will vary, making the final machining pass much more difficult.
After the cleanup pass, take precise measurements. Use an inside micrometer or a bore gauge to find the maximum wear point. This measurement tells you exactly how much material you need to add to return the bore to OEM diameter. It also helps you determine the number of weld passes required. Finally, select the appropriate mounting hardware for your drive head. Choosing the right brackets and standoffs ensures the welder stays stable throughout the entire rotation. If you're looking for the right components for a specific job, you can view our bore repair accessories to see the various mounting options available.
Establishing a Centerline
Alignment is the most critical part of the setup. You aren't just filling a hole; you're restoring a mechanical pivot point. Use setup cones or spherical bearings to find and lock in the original OEM centerline. If your alignment is off by even a fraction of an inch, the machine geometry will be compromised, leading to premature wear on pins and seals. For work in cramped environments, the BOA-C45 system is designed to mount in tight spaces where standard hardware won't fit. Always double-check your alignment before locking down the drive head.
Metallurgical Considerations
Don't ignore the properties of the metal you're working on. Heavy castings often require pre-heating to 300 or 400 degrees Fahrenheit to prevent the new weld from cracking as it cools. You also need to match your welding wire to the base metal. Using a standard mild steel wire on a high-tensile alloy casting can lead to structural failure under load. Never attempt to weld over grease-impregnated or porous surfaces. If the metal looks "sweaty" when you apply heat, it's a sign that oil is trapped in the pores, and you need to continue cleaning until the surface is dry and stable.
Step 2: Rebuilding Material with Automated Bore Welding Systems
Once you've established your centerline and prepared the surface, it's time to begin the welding cycle. The BOA-408i serves as the industry standard for this process because it automates the most difficult aspects of out-of-position welding. Your first priority is setting the rotation speed and the step-over. The step-over is the axial distance the torch moves during one full revolution. You need a setting that allows each new bead to overlap the previous one by approximately 50%. This overlap ensures a smooth, continuous surface without "valleys" that could trap slag or create voids in the finished repair.
Initiate the spiral weld path to apply a uniform layer of new metal. Unlike manual welding, where you're constantly stopping to reposition, automated bore welding systems maintain a consistent arc length and travel speed. This consistency is what creates a high-quality metallurgical bond. As the machine runs, monitor the "tie-in" between the beads. You're looking for a flat, even profile. If the beads look like a series of distinct ridges, your step-over is likely too wide. Managing heat input is equally critical. If you pump too much heat into a single area, you risk warping the surrounding structural components. If the part is getting too hot, use a "skip welding" technique or allow for cooling periods between passes.
Programming the Spiral Path
To program the cycle correctly, calculate the axial travel needed for the full depth of the bore. You don't want the torch to stop short or run past the edge of the parent metal. Most modern systems allow you to adjust the torch for more than just internal diameters. You can often configure the equipment for OD (outside diameter) welding or face welding to rebuild worn thrust surfaces. One of the biggest advantages of the BOA system is the pass-through drive. This feature allows the welding bar to extend through the drive head, making it possible to weld bores that are up to 10 feet apart on a single setup, which is a massive time-saver for large-scale field repairs.
Troubleshooting the Weld
Even with the best equipment, you need to watch for signs of trouble. Porosity is usually the result of poor cleaning or a lack of shielding gas. If you see tiny holes in the weld bead, stop immediately and re-clean the surface. Erratic wire feed is another common issue, often caused by a kinked liner or a worn contact tip. Understanding these mechanical nuances is part of why many shops prefer bore welding vs manual repair when dealing with high-stakes equipment. For extremely oversized holes, don't try to fill the entire gap in one heavy pass. It's better to apply a second pass to build up the thickness gradually, ensuring the integrity of the metal stays intact.
Step 3: Precision Machining with Portable Line Boring Equipment
The welding cycle is complete. You've added enough material to compensate for the wear. Now you must transform that raw weld into a precision-finished surface. Mount your line boring bar through the freshly welded bore, using the same centerline established during the setup phase. This is where the synergy between boring and automated bore welding systems becomes apparent. Because the automated weld is uniform, your boring tool won't encounter the erratic hard spots or voids common with manual repairs. The consistency of the weld bead allows for a much more predictable machining process, which saves your cutting bits and your time.
Start with a rough-cut. Your goal is to remove the bulk of the new material and bring the bore to within 0.020 inches of your final target diameter. Take your time during this phase. If you try to hog out too much metal in a single pass, you risk tool chatter or bar deflection. Once the roughing is done, switch to finish passes. These final cuts are what achieve the exact interference fit required for your new bushings. A perfect fit ensures the bushing won't spin or move under heavy structural loads. Always verify the final diameter using precision bore gauges or micrometers. Trusting the machine's dial is never a substitute for a physical measurement in a professional shop.
Tooling and Bit Selection
Cutting through new weld material is different from cutting through parent metal. You need carbide inserts that are specifically designed to handle interrupted cuts. These cuts occur because the weld surface isn't perfectly smooth. If you use the wrong grade of carbide, the tip will chip as it hits the ridges of the weld bead. You can find specialized cutters and other bore welding accessories to ensure your setup is optimized for this task. Adjust your RPM and feed rates based on the diameter of the bore. A slower feed rate combined with the correct tool geometry will produce a mirror-like finish that prolongs the life of your bushings and pins.
Snap Ring and Face Machining
Restoring the bore diameter is only part of the job. You also need to address the retaining paths and thrust surfaces. Use a thru-bar snap ring groove system to restore clip paths exactly where they were originally located. This eliminates the need for secondary setups or hand-grinding grooves. Additionally, use a facing head to machine the bore ends. This ensures that thrust washers sit flush against the housing, preventing lateral movement of the pivot pin. Before you pull the bar, perform a final inspection of the entire assembly. If you are ready to upgrade your shop's efficiency, browse our full line of line boring machines to find the right fit for your equipment.
Scaling Your Repair Capabilities with Bore Repair Systems
The BOA-408i is designed for this type of high-stakes versatility. It excels across the construction and mining sectors, where equipment faces extreme structural loading and constant abrasion. We have manufactured these USA-made systems since 1995, focusing on a modular design that simplifies field service. The equipment is rugged enough to handle the vibration of a mining site but precise enough for shop-based overhauls. Choosing a system built for durability ensures your investment remains a reliable asset for decades, not just a few seasons.
The Value of Professional Training
A tool is only effective if your team knows how to use it. We bridge the skills gap in your maintenance department by providing free operator training for all customers. This training covers the nuances of bead placement, heat management, and machine alignment. Proper technique directly impacts machine longevity and operator safety. When your team masters these automated bore welding systems, they produce repairs that meet or exceed OEM specifications. If they encounter a complex field-repair scenario, our technical support team is available to guide them through the resolution, ensuring the job is done right the first time.
Getting Started with Your Own System
Every fleet has different needs. While the BOA-408i is a powerhouse for large-scale work, you might require the BOA-M1 for compact, tight-access repairs where space is at a premium. Matching the right system to your specific equipment lineup is essential for maximizing efficiency. Our experts can help you evaluate your typical wear patterns and machine sizes to recommend the ideal package. Taking the next step toward self-sufficiency will transform your maintenance department into a profit center. To get a tailored solution for your shop, contact Bore Repair Systems, Inc. for a custom quote today.
Take Control of Your Equipment Maintenance Workflow
Rebuilding worn bores is a three-stage mechanical restoration that turns a failed component back into a reliable asset. By following a methodical process of preparation, uniform weld deposition, and precision machining, you eliminate the guesswork that usually plagues manual repairs. This approach ensures your equipment returns to the field with OEM-level integrity. It's about more than just filling a hole; it's about restoring the mechanical geometry of the machine to ensure long-term durability.
Implementing automated bore welding systems reduces your dependence on outside vendors and slashes your total downtime. We've manufactured these systems in the USA since 1995, incorporating patented thru-bar snap ring groove technology to simplify the most complex aspects of the job. Every purchase includes free anytime training to ensure your team stays proficient and safe. Don't let worn pivot points dictate your project deadlines. It is time to stop scrapping expensive components and start restoring them with confidence.
Build your in-house repair capability with Bore Repair Systems and secure the long-term reliability of your fleet. You've got the expertise to manage your equipment; now you have the tools to match.
Frequently Asked Questions
How much material can an automated bore welder add in one pass?
An automated bore welder typically adds between 1/8 inch and 3/16 inch of material per side in a single pass. This thickness is ideal for most standard wear patterns seen in construction and mining equipment. If a bore is severely oversized, you can apply multiple layers to build up the parent metal. The system's consistent travel speed ensures that each layer bonds perfectly without creating the uneven ridges often found in manual welding.
Can you rebuild a bore without completely disassembling the machine?
Yes, you can rebuild a bore while the component remains attached to the machine. Portable automated bore welding systems are specifically designed for field service, allowing you to perform repairs on-site rather than transporting massive parts to a machine shop. By mounting the equipment directly to the housing, you save days of teardown and reassembly time while maintaining precision alignment throughout the entire welding and boring process.
What is the difference between a bore welder and a line boring machine?
A bore welder adds material to a worn surface, while a line boring machine removes material to create a finished diameter. These two tools work as a pair in a professional restoration. The welder applies a uniform layer of new metal to "fill in" the wear. The line boring machine then cuts through that new material to achieve the exact size and concentricity required for a new bushing to seat correctly.
Is it possible to fix an egg-shaped hole with just a line boring bar?
You cannot fix an egg-shaped hole with just a line boring bar because it only removes metal. If you try to bore out an oval hole until it's round, you'll end up with a diameter that is far too large for standard bushings. You must first use a welder to add material back to the worn areas. Once you've restored the "meat" of the metal, the boring bar can cut it back to the original OEM size.
What kind of welding wire is best for heavy equipment bore repair?
Most heavy equipment repairs use ER70S-6 solid wire with a 75/25 Argon/CO2 gas mix. This combination provides excellent puddle control and a strong metallurgical bond on mild steel and common castings. You should always match the wire to the specific base metal of your equipment to ensure structural integrity. For high-tensile alloys, specialized wires may be necessary to ensure the repair can handle the original design loads without cracking.
How long does it take to learn how to operate an automated bore welding system?
Most technicians can learn the basic operation of automated bore welding systems in less than a day. While mastering the nuances of heat control and travel speed takes practice, the equipment is designed for straightforward operation. We provide free operator training with every purchase to help your team bridge the skills gap quickly. This hands-on guidance ensures your staff can produce professional-grade results on their first real-world repair job.
Can automated systems weld in vertical or overhead positions?
Yes, these systems are fully capable of welding in vertical, horizontal, and overhead positions. The automated torch maintains a consistent arc and feed rate regardless of gravity, which is a significant advantage over manual welding. Manual overhead welding is physically exhausting and prone to inclusions. The machine handles the difficult positioning, allowing the operator to focus on monitoring the weld quality and managing the step-over settings.
What are the power requirements for a portable bore welding system in the field?
Portable systems generally require standard 115V or 230V AC power, which can be supplied by a common jobsite generator. The welding power source itself usually requires a 200 to 300 amp DC output, which is standard for most industrial MIG welders. Because the drive systems are modular and efficient, they don't require specialized high-voltage hookups. This makes them ideal for remote field repairs where utility power is unavailable.


Comments